
What are the lands and what does “Finding the Lands” mean?
Rifling consists of two different diameters to be able to engage the bullet and cause it to spin. The larger diameter is called the groove diameter, while the smaller diameter is the bore diameter. For example, in a .308 barrel the groove diameter is .308″ but the bore diameter is .300″. The bullet diameter is the same, or close to, the groove diameter, and this gives us .004″ deep engraving per rifling. The top of the rifling at the bore diameter is known as the lands, which then drop off each side to the bore diameter giving us our rifling cross section.
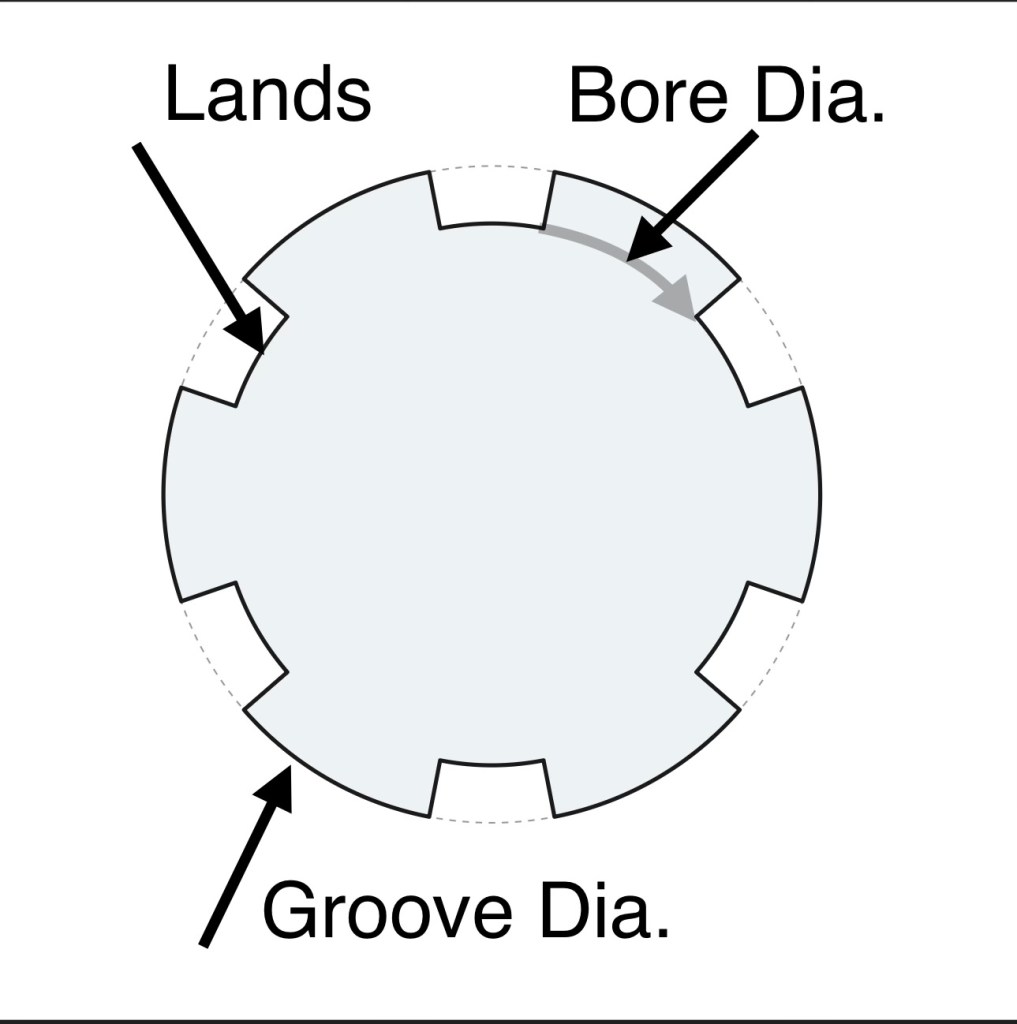
When a cartridge is loaded into the chamber, you don’t want the bullet engraved by the rifling immediately when the bolt closes. The distance the bullet has to travel before it contacts the rifling is known as “Bullet Jump”. Or how much the bullet has to jump out of the case before it hits the rifling. Since there is a lead angle into the rifling though, it will hit somewhere on that angle, depending on chamber and bullet shape. “Finding the lands” is seeing how far a bullet can be seated out before it contacts the lands. Or the max length of the cartridge before it touches the rifling. Now if we know the max length to the rifling, seating the bullet .020” shorter than that max length gives us .020” of jump. And that’s how the jump is calculated.

Bullet jump is an important part of the reloading optimization process. For the full breakdown of why bullet jump affects accuracy, see our Bullet Jump and Seating Depth article.
However, because bullet shapes vary by weight, style, and manufacturer, the distance to the lands will vary and needs to be found for each different bullet used.
There are multiple methods to do this and some specialized equipment, such as the Hornady COAL gauge, that require specific components. Since I have not used any specialized equipment, I will walk through this with the method I use just using my standard reloading gear.
What You’ll Need
- Bullet you will be using (Brand, Caliber, Weight, and Type)
- cartridge brass (A fired piece that hasn’t been sized yet is best)
- Sizing die (Neck bushing style or different expander size options are a plus)
- Calipers
- Ogive comparator (Will give much better results than measuring overall length)
Step-by-Step: Finding Your Lands
To find where the bullet contacts the lands, we have the bullet seated excessively long on purpose. Then, when the cartridge is inserted into the chamber and the bolt is closed, the bullet will hit the rifling and be pushed back into the case giving us our true length to the rifling. However, we must have this setup correctly. If the neck tension is gripping the bullet excessively, the bullet will not be pushed back into the case but will be pushed into the rifling to the point that it engraves the bullet. This will not give us an accurate measurement to how far we can seat the bullet.
DO NOT DO THIS WITH A LIVE ROUND! NO PRIMER OR POWDER SHOULD BE IN THE CASE. MAKE SURE GUN IS SAFE, CLEAR, AND UNLOADED WHILE FOLLOWING ALL GUN SAFETY PROCEDURES.
First: The case neck must be sized to appropriately grab the bullet. For this, I find that a fired case that hasn’t been sized yet it best. The neck expands when fired and the bullet is able to slide back in freely. If starting with a sized or new case, an expander will be needed to increase the inside diameter so there will not be too much force on the bullet. For a fired case, I will use a die bushing that will give me roughly .0005″ of neck tension. Enough that the bullet can slide with little force, but be able to maintain its position. To see which bushing or expander would work for you, check the Neck Tension Calculator. If you do not have bushings or expanders, just size the top 1/4 of the neck or so. As little as you can while still grabbing the bullet, to reduce any friction and force needed to push it into the case.
Second: The bullet is inserted into the case just enough to grab it and keep it in position. We want it excessively long on purpose, so we know that the bullet will have to be pushed in to close the bolt.
Third: Place the cartridge into the chamber and slowly close the bolt on it. Do not do this fast and feel for any excessive force to close.
Fourth: Check the bullet. Look for any engraving or deformation of the bullet. If there is any visible markings from the rifling, the bullet was grabbed too tightly by the case and wasn’t allowed to slide into the case neck. One thing I occasionally do is use a black sharpie to color the bullet. Then, if any engraving occurs it will show up more visibly.
Fifth: Use the ogive comparator to take a measurement from the cartridge base to the bullet ogive. If everything else was done correctly, this will be the max length to when the bullet hits the lands. Now when you start reloading and setting seating depth you have a measurement to use to calculate the bullet jump.
Note: For some cartridges with longer chamber throats, you may reach the maximum length that will fit in the magazine before you reach the max overall length. In that case, the length that can fit in your magazine is the max length you can use, but you can still calculate the jump.
Below is a video walkthrough of me doing this process for my rifle.
Quick Reference (Short Version)
Here is a quick short showing a modified version. In this instance I have a new piece of brass that I opened the neck up on using an expander mandrel. This mandrel is made to size it for a neck turning pilot, so it is not as tight on the bullet as others.
Common Mistakes
- Case neck is too tight and bullet is engraved by rifling
- Different bullets of the same caliber are assumed to have the same max length
- Measuring from cartridge base to tip of bullet. This measurement can fluctuate .010″ or more.
Once you’ve measured your lands, log it and start testing jump increments in the Load Development Lab. Track your data across sessions so you never lose a node.